This post was last updated on January 18th, 2023
When I wrote my Tokaido strategy guide, I mentioned 3 core concepts at the beginning of the article, and one of those was related to the extreme difference among all the Tokaido characters.
I also said that this game is very character-centric and in this article I’m going to explain why.
The best way to explain that is probably by listing all the characters you can use in the base game, and for each one of them writing an overview and a quick strategy I’d follow in order to maximize your chances to win with that particular character.
Quick premise: this is a strategy for the Tokaido base game only, without expansions!
- Tokaido Characters – Core Concepts
- Tokaido Characters – Overview & Strategy
- #10 | Hiroshige the Artist
- #09 | Satsuki the Orphan
- #08 | Chuubei the Messenger
- #07 | Umegae the Street Entertainer
- #06 | Sasayakko the Geisha
- #05 | Mitsukuni the Old Man
- #04 | Zen-emon the Merchant
- #03 | Yoshiyasu the Functionary
- #02 | Hirotada the Priest
- #01 | Kinko the Ronin
This post may contain affiliate links. If you click through and make a purchase, I will get a commission at no extra cost to you. See our Affiliate Disclosure.
Tokaido Characters – Core Concepts
When it comes to evaluating the characters you can use in the game, there are 2 main things I’d like to discuss: coins and abilities.
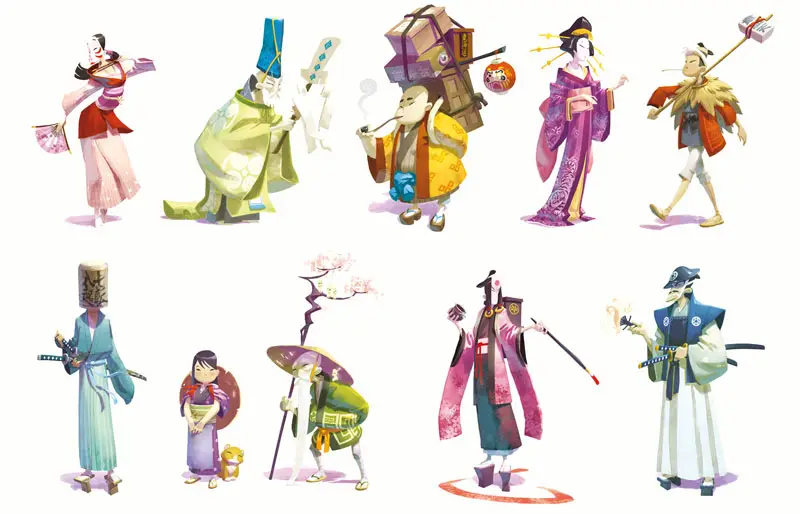
There are 10 characters in the base game and each of them starts with a different amount of coins and a unique ability; these two things will tell you how strong a character is.
Coins
They are probably the most important aspect of the game, in fact, the core of the gameplay revolves around scoring the most points in order to win, points that can be obtained in various ways including buying Souvenirs, donations to the Temple and eating meals at roadside Inns.
It goes without saying that the more coins your character have from the beginning, the more chances you have to win (theoretically…).
I will assign a value, ranging from 0 to 10, to each character based on the number of initial coins they have.
Character’s ability
This is where things get more interesting, as each character can count on a unique ability that makes them stand out.
These abilities let you buy cards for fewer coins, make free donations to the Temple, acquire cards for free, earn additional points, and so on.
Compared to the coins it’s quite more difficult to assign a 0 to 10 value to each character because all these abilities could be pretty useful in the right situation, although there are some better than others.
Tokaido Characters – Overview & Strategy
#10 | Hiroshige the Artist
#09 | Satsuki the Orphan
#08 | Chuubei the Messenger
#07 | Umegae the Street Entertainer
#06 | Sasayakko the Geisha
#05 | Mitsukuni the Old Man
#04 | Zen-emon the Merchant
#03 | Yoshiyasu the Functionary
#02 | Hirotada the Priest
#01 | Kinko the Ronin
#10 | Hiroshige the Artist
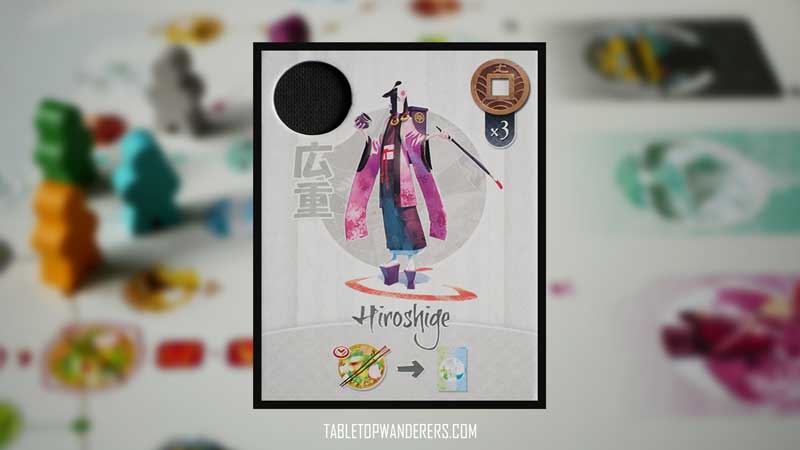
Overview
- Starting wealth: 3 coins.
- Ability: 1 Panorama card of his choice at the 3 intermediate Inns.
Hiroshige starts poor, with only 3 coins in his pockets and that puts you already in the difficult situation of having to choose free stops over the ones you have to spend money on.
His ability could lead you to decent outcomes if you manage to maximize those 3 free Panorama cards.
I personally think there are better abilities out there.
Strategy
Generally speaking, his strategy will almost be based on collecting points from free activities in order to save the few coins he has for Inns and possibly the Temple.
If I were to start a game with this character I would try to get on specific spaces following this order:
3rd space, Encounters – you should go on this space as your first move since you can’t really afford to buy souvenirs or make donations to the Temple. Ideally, you’d want a Kuge card (3 coins) but all the other encounters are kind of good too.
If you get Kuge, you could potentially skip the Farm space since you’d have 6 coins at that point, otherwise, the Farm should be a mandatory stop for you.
5th space, Hot Springs | 6th space, silver Panorama – I’d go to the hot springs for the free points or to the silver Panorama to start building your collection, as Panorama will be your main source of points.
From here onwards the overall strategy I’d follow would be to aim for Panorama, Hot Springs, Encounters, and Farms if you need to refill your pockets before reaching any Inn.
Achievements within reach: Panorama.
#09 | Satsuki the Orphan
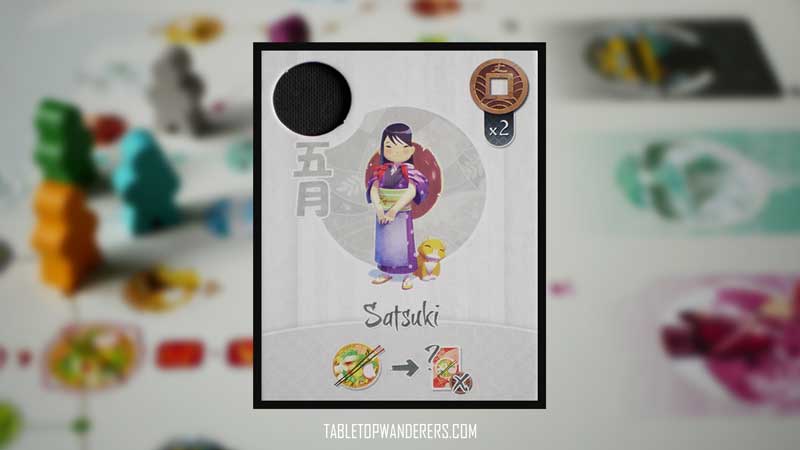
Overview
- Starting wealth: 2 coins.
- Ability: 1 of the available meal cards at random for free at any Inn.
Satsuki is even poorer than Hiroshige since she starts with just 2 miserable coins, and same as the artist above your strategy will revolve around getting free points most of the time.
The reason she’s not in the last place is only because she has a more interesting ability, in fact, she can save a decent amount of coins due to the fact that she can eat free meals.
This ability could get you in trouble though if lady luck and other players will get in the way.
Strategy
Same as the previous character, her strategy will be based on collecting points from free activities most of the time, but after you pass the first quarter of the game you should have some spare coins to spend on more rewarding activities such as making donations to the Temple or buying souvenirs.
If I were to start a game with this character I would try to get on specific spaces following this order:
3rd space, Encounters – same as above, you can’t buy souvenirs or make donations to the Temple so you are better off starting with an Encounter space.
A Kuge card (3 coins) is the main prize but all the other encounters are also good.
If you get Kuge, you could skip the Farm since you have enough money to buy souvenirs or make a donation to the Temple.
On the other hand, if you didn’t get Kuge, I’d put the Farm stop on the radar.
5th space, Hot Springs | 7th space, Farm – hot springs for the free points or the Farm for the 3 coins (if you didn’t get Kuge at the previous stop).
9th space, Temple – at this point of the game you should have 5 coins, so I’d stop at the Temple to make a donation of 3 coins; it’s very important because this amount of money will probably guarantee you the 2nd place at the end of the game (7 points).
From here onwards the overall strategy I’d follow would be to aim for Encounters, Hot Springs, Farms (this is very important before you reach the 3rd and last Inn as you want to make sure to not skip a meal) and Souvenirs with the remaining spare money.
Achievements within reach: Gourmet.
#08 | Chuubei the Messenger
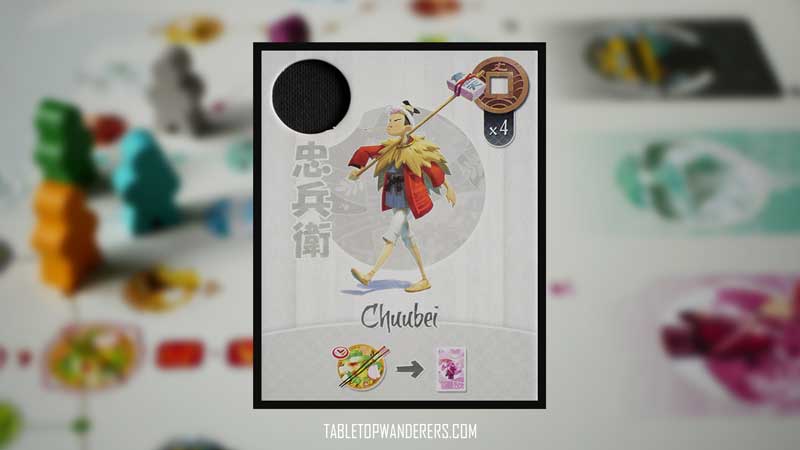
Overview
- Starting wealth: 4 coins.
- Ability: 1 free random Encounter card at the 3 intermediate Inns.
Chuubei’s wealth isn’t great but starting with 4 coins makes him in the position of having a few spare coins to spend on Souvenirs after a mandatory visit to the Farm.
His ability guarantees 3 Encounters cards which will be helpful in order to get some random bonuses and to aim for the Chatterbox Achievement.
Strategy
When you pick this character you may want to base your strategy on mixing free activities and paid activities, mainly following the free cards you get when you randomly draw from the Encounters pile, thanks to his ability.
This is applicable from the second quarter of the map onwards, which is basically when you’ll pick your first free encounter card.
For example, if you draw a Panorama card I’d try to complete that panorama, or if you draw a souvenir you may want to consider completing a set since you will also have few coins to spare.
What would I do before the first Inn? This:
3rd space, Encounters – I’d start here to get my first encounter card (aiming for the Chatterbox achievement remember?) and use this first card to build the strategy for the next steps.
A Kuge card (3 coins) is always the best prize but all the other encounters are very good as well.
I’d go to the Farm even if you drew a Kuge card since you want to accumulate a good amount of money to support your very diversified strategy.
4th space, green Panorama | 5th space, Hot Springs | 7th space, Farm – depending on what you got from the encounters draw, I’d go to the Panorama space (if available, unlikely), to the hot springs for the free points and most importantly to the Farm for the 3 coins (even if you got Kuge at the previous stop).
10th space, Encounters – at this point of the game you should have 7 or 10 coins and you have multiple choices. You could make a donation of 3 coins to the Temple or buy a few souvenirs, but I would personally aim for the next Encounter space to get another random card.
Then, either the two Panorama or the Hot Springs are good choices.
When you first stop at the Inn, you will get another free encounter card and from here onwards you can easily understand on which spaces your character should land on, based on the pink cards you have accumulated so far (2 or 3 cards).
Achievements within reach: Chatterbox and Panorama (depending on the draws).
#07 | Umegae the Street Entertainer
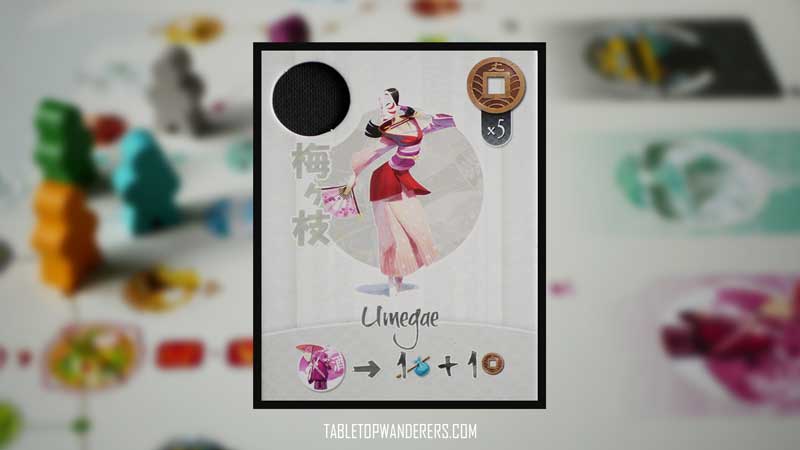
Overview
- Starting wealth: 5 coins.
- Ability: 1 extra coin and 1 extra point from any Encounters stop.
Umegae starts with a decent amount of coins which allows you to spend some money since the start.
Thanks to her ability you’ll be able to earn coins every time you make an encounter, in fact stopping at the encounters spaces will give you 1 additional point and 1 additional coin. Pretty handy!
Strategy
Umegae’s strategy revolves around maximizing the extra points/coins by trying to land on as many encounters as possible.
It won’t be too easy because there are several characters that will surely build the strategy around these spaces.
If I were to start a game with this character I would proceed as follow:
3rd space, Encounters – even though you could make donations or buy a couple of souvenirs, I’d choose this space over the other for the reason explained above. You’ll want to get on this type of spaces as a priority in order to get those juicy extra points/coins.
5th space, Hot Springs | 6th space, Panorama – if you land on the encounters is unlikely that you could also land on the hot springs, but if that would be free I’d there, otherwise the silver Panorama would be a good alternative.
9th space, Temple | 10th space, Encounters – depending on the position of the other players I’d go on either of these 2; at the temple to make a 2 coins donation or at the encounters to follow the main strategy.
From here onwards you can carry on with the strategy by mixing encounters with other activities. Since the encounters will give you such different cards, I’d follow whatever makes more sense based on your draws.
Achievements within reach: Chatterbox, Panorama.
#06 | Sasayakko the Geisha
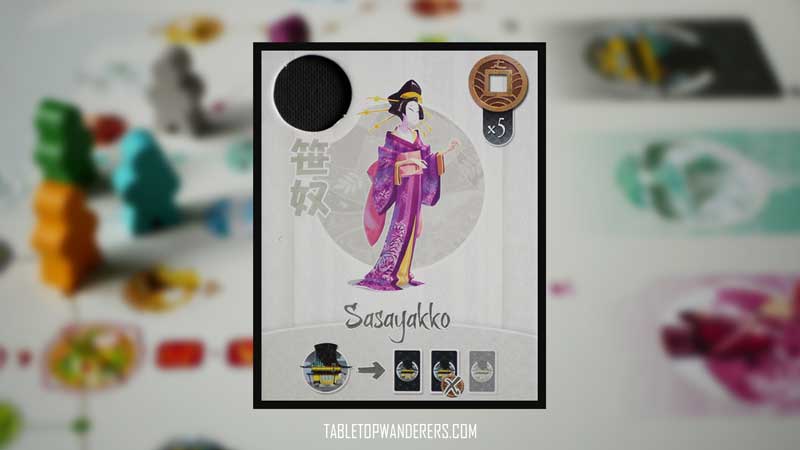
Overview
- Starting wealth: 5 coins.
- Ability: 1 free Souvenir (the cheapest) when she purchases at least 2 souvenirs.
Sasayakko has a decent amount of money from the very start of the game, which could be used to buy souvenirs straight away to maximize her very useful ability.
When she purchases 2 or more souvenirs from the Village, the cheapest one is given to her for free (she has to have the money to cover the price of the cheapest souvenir too, even though she doesn’t actually pay for it).
Strategy
If you pick this character you should base your strategy on exploiting her ability from the beginning of the game.
Your primary objective is to get as many souvenirs as possible since they will give you a ton crap of points and you can save a very good chunk of coins when you buy them.
To be sure to be able to cover the cost of all the souvenirs you want to buy I’d try to always have 4 or 5 coins in your pockets, and this is why Farms are the second most important stops for you.
If I were to start a game with this character I would proceed as follow:
1st space, Village – you start the game with 5 coins, so I would go on a shopping spree at the very first village.
Based on the opponents’ characters you can choose whether to buy 2 or 3 items as you want to make sure to have at least 2 coins in your pockets before reaching the Inn.
If you’re worried other players will aim for the 7th space, Farm I’d try to spend as less coins as possible at the Village.
7th space, Farm – it’s vital that you land on this stop after buying the souvenirs. You will always want to keep your pockets heavy on coins and this is the easier way to get them. Farms will be the fuel of your strategy, always keep them in your sight.
Landing on this space after the very first Village is quite a big jump since you’re skipping many spaces and I’m not a huge fan of this move personally; you kind of need to judge what the other players might need and if you think they won’t steal your coins you could perhaps take a break at the Hot Springs before going to the Farm. Very risky, but if you like playing with fire…
When you arrive at the Inn be sure to buy the cheapest meal in order to not waste your precious coins.
From here onwards just rinse and repeat: Village -> Farm -> cheap meals.
In the last quarter of the game, I’d try to place a donation to the Temple to accumulate more points and you could try to get some points from the Hot Springs here and there if you don’t feel like making such big jumps.
Achievements within reach: Collector.
#05 | Mitsukuni the Old Man
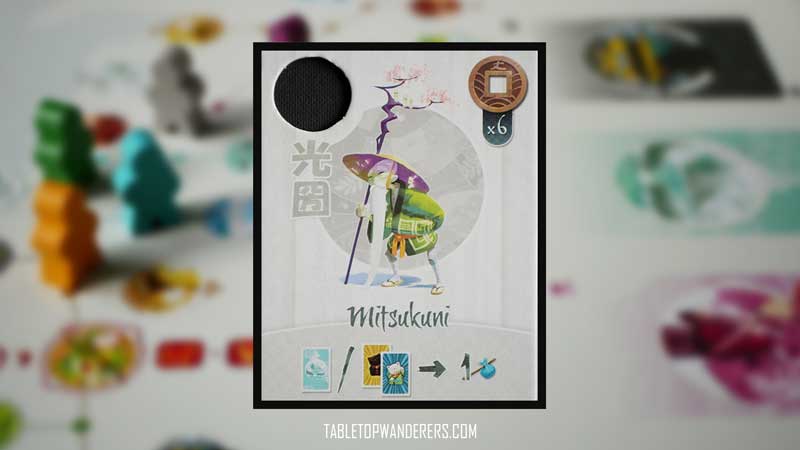
Overview
- Starting wealth: 6 coins.
- Ability: 1 additional point for each Hot Spring and Achievement card.
The Old Man is very wise and knows that if you’re going to start a journey you need to save up some money, and in fact, he accumulated 6 coins which is a good amount to start with.
Any character with an initial amount of 6 or more coins can be considered “rich”, and this is a huge advantage compared to the poorer characters.
He also has a useful ability that can give him additional points for each hot spring and achievement card he collects. This means your strategy can be broader and not too tied to certain activities that could limit you.
Strategy
The strength of this character is the possibility to go broader with his strategy since he doesn’t have to land on certain spaces at all costs.
Sure, landing on the Hot Springs every single time you could it’ll be the best way to maximize his ability, but you could also consider taking the Hot Springs as they come and not necessarily build your strategy around them.
He will also get additional points for each Achievement card so you can adapt your strategy as the game progresses.
If I were to start a game with this character I would proceed as follow:
1st space, Village | 2nd space, Temple – I’d start the game on either of these two spaces, you can choose, and for each of them I’d spend 3 coins.
This is a call you can make based on what character the opponents have chosen.
5th space, Hot Springs – I’d probably go here if there will be available spaces; this will be your first bonus point!
From here onwards you can really adapt your strategy based on other players’ strategies too. I’d try to get on as many hot springs as possible but don’t forget to aim for panorama, souvenirs, meals and any other activity that could give you additional points.
A good result would be getting the Bather achievement for the hot springs and two other achievements of your choice.
Achievements within reach: Bather.
#04 | Zen-emon the Merchant
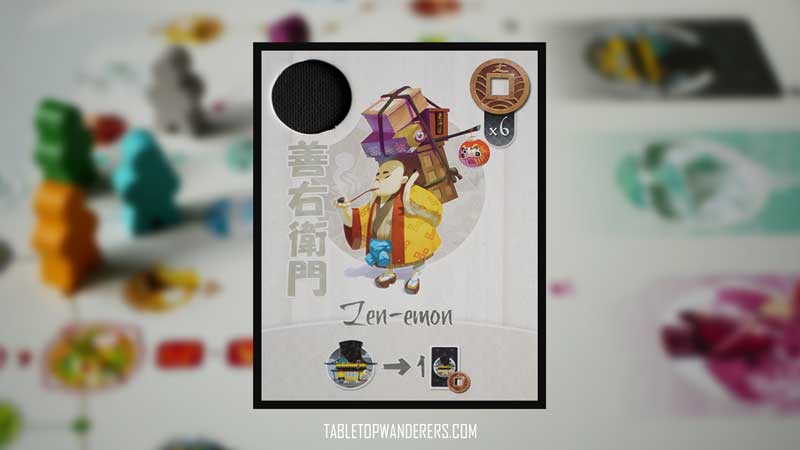
Overview
- Starting wealth: 6 coins.
- Ability: he can buy a souvenir for 1 coin instead of the actual price at each Village.
Zen-emon is a strong character who didn’t make it in the top 3 positions by a whisker.
If you pick up this character you’ll start with a good amount of coins and one of the most useful abilities in the game, as you can buy a souvenir for 1 coin rather than the actual price.
There are many souvenirs that cost more than 1 coin so you could save tons of money if you pursue a strategy based on this activity.
Strategy
This character’s strategy is pretty straightforward.
You’ll want to maximize his ability so I’d go all-in with the souvenirs hunt since you can get them for a discounted price. The saved money can be invested in other activities such as a donation to the Temple, win-win!
If I were to start a game with this character I would try to get on specific spaces following this order:
1st space, Village – the first space is a no-brainer, stop at the Village and buy all the items you drew; if you’re lucky enough you could get 3 different categories of items for 3 coins.
I’d buy 3 items anyway (even if you got dupes) since you’ll likely complete 2 or 3 sets by the end of the game. That’s your goal.
5th space, Hot Springs – 2 or 3 free points, I’d go here.
7th space, Farm & 8th space, Village – after the hot springs I’d try to land on the Farm in order to refill your pockets with 3 coins. Then, I’d go straight to the Village; it’s very unlikely you can pull this combo off, but depending on who you’re playing against you might be that lucky.
If you can land on both these spaces I’d immediately spend another 3 or 4 coins to buy all the souvenirs.
If you can’t land on the village space you could consider spending those 3 coins at the Temple in the form of a donation, test your luck at the encounters space or keep them for the next villages.
From here the strategy is very simple, you have to aim for Village and Farm as a top priority as you want to complete as many sets as you can.
Then you can make some stops at the hot springs for a decent amount of free coins and at the encounters and pray for lucky pulls (Kuge or Shokukin).
Achievements within reach: Collector.
#03 | Yoshiyasu the Functionary
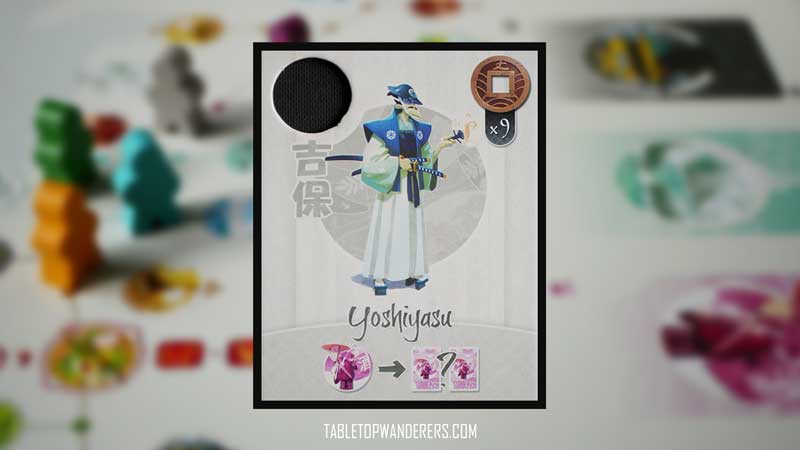
Overview
- Starting wealth: 9 coins.
- Ability: draws 2 encounter cards at each encounters space and keeps the one he wishes.
Here we are with the 3rd best character in the game, Yoshiyasu.
He’s the richest among all the Tokaido characters as he starts with a very large bag of money (9 coins) that allows you to do pretty much whatever you want.
His ability is also very powerful since he can mitigate lady luck’s influence by drawing 2 cards and choosing one, rather than just taking whatever comes his way.
Strategy
A strategy based on mixing Encounters and other activities of your choice should lead you to a win if you can maximize the extra money you have from the beginning.
So, your first priority is to land on as many encounters places as you can, in order to draw interesting cards and to get the Chatterbox achievement.
Then you could spend your coins at the Villages or you could think about making a big donation at the Temple in order to earn those 10 extra points.
If I were to start a game with this character I would try to get on specific spaces following this order:
3rd space, Encounters – I’d start with the right foot by landing on the first encounters space and choosing the best option, according to your opponents’ charachers also.
When it comes to choosing the card you want to keep I’d go for Kuge, Samurai, Miko, Shokukin, and Annaibito in this order.
5th space, Hot Springs – 2 or 3 free points, I’d probably go here.
7th space, Farm | 8th space, Village – this choice really depends on which encounter card you took. If you got Kuge, then I’d go spend some coins at the Village. Otherwise, I’d land on the Farm to earn 3 juicy coins.
10th space, Encounters – if you chose to go for the 3 coins there might be a chance that you can also make a stop here; if that will be the case I’d take it without hesitations.
From this point onwards the strategy will follow this rotation based on how the game progresses: Encounters -> Farm/Village/Temple -> Hot Springs.
Achievements within reach: Chatterbox, Collector (maybe), Bather (maybe), Gourmet (maybe).
#02 | Hirotada the Priest
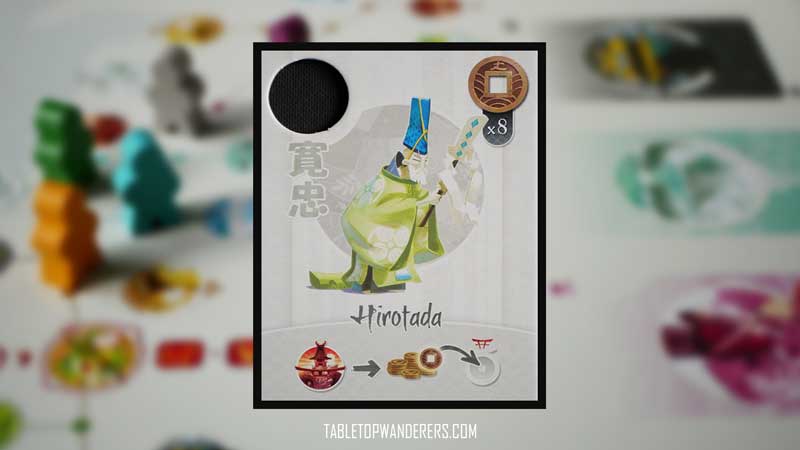
Overview
- Starting wealth: 8 coins.
- Ability: every time he stops at the Temple he can take 1 coin from the bank and add it to his donations.
Hirotada is the second richest playable character among all the Tokaido characters since he starts with 8 coins.
This amount of money can easily allow you to follow any strategy you like without going bankrupt after 2 stops.
His strong ability guarantees him a free coin to donate to the Temple each time he stops there, so you might want to land on as many Temple spaces as possible (until your reach a certain point) to maximize that bonus.
Strategy
When I think about a strategy for this character I immediately picture the Temple as my pivotal activity around which everything else revolves.
Since he can donate 1 additional free coin (and get 1 point) each time this character stops at the Temple, you should stop there as many times as you can, and not offer a 3 coins donation in one batch as I always suggest.
The fact that he’s also very rich will make Hirotada one of the best choices if you want to increase your chances to win the game.
If I were to start a game with this character I would proceed as follow:
2nd space, Temple – Easy choice here, I’d go to the Temple to donate 1 coin and get 1 additional coin from the bank. This stop will grant you 2 points and it’s the first step towards the goal of being the most generous player that will give you 10 additional points.
5th space, Hot Springs – as I often suggest this stop is a good space to get 2 or 3 free points in between your main targets.
6th space, silver Panorama |7th space, Farm – this choice mainly depends on the opponents as this would be the stop before your main goal: the Temple at the 9th space.
If you see that the opponents are short on money and they will likely aim for the Farm, I’d go to the silver panorama in order to start before them on the next turn and secure the stop at the Temple.
On the other hand, if your opponents have some money saved and they will aim for the Village, I’d stop at the Farm, take the 3 coins and accept the risk of losing the Temple.
9th space, Temple – another key stop for your strategy, where I’d donate another coin (+ 1 bonus) which would likely put my character in the top position of the donor ranking.
From now on, I’d follow the strategy of stopping at the Temples until you secure the first place and then I’d start using the coins you have from the beginning on activities like Souvenirs, which will give you plenty of points.
Achievements within reach: Collector (maybe), Bather (maybe).
#01 | Kinko the Ronin
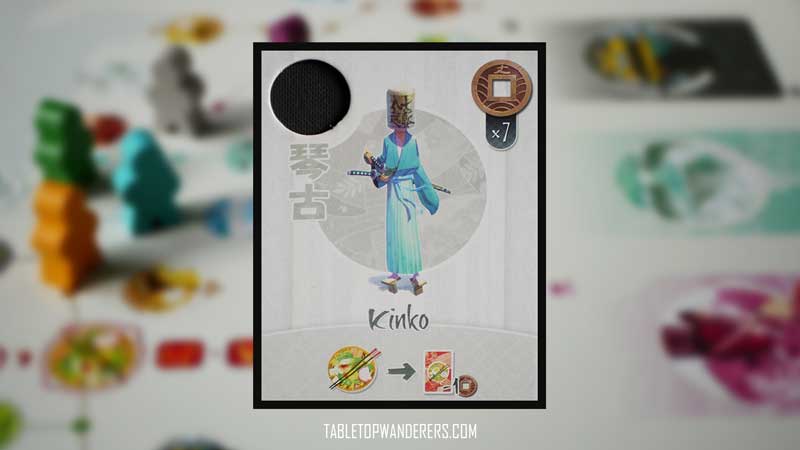
Overview
- Starting wealth: 7 coins.
- Ability: each meal he purchases costs 1 coin less.
The top position is finally revealed and it couldn’t be no other than Kinko the Ronin.
This powerhouse character starts with fewer coins than other Tokaido characters at the top positions, but he has a crazy advantage: his ability.
This one, in fact, allows him to pay 1 less coin for each meal he purchases, meaning that if you always aim for 1 coin meal, as recommended in my Tokaido strategy guide, you’ll get that meal for free.
This is by far the best coins per points value where you’ll get 6 points out of 0 coins spent.
Strategy
When it comes to Kinko’s strategy you have the freedom to basically do whatever you want.
You’ll have 7 coins from the start and a very strong ability to count on, so you could potentially build a strategy on both Village and Temple, and throw in the mix a couple of free points activities such as Hot Springs and Encounters.
You aren’t locked into the goal of landing on certain spaces to maximize the ability of this character, so you could really “relax” and enjoy the journey by walking very slowly, aka without skipping any stops to reach your desired one.
If I were to start a game with this character I would try to get on specific spaces following this order:
1st space, Village – I’d go here to grab a couple of souvenirs and start my collection from the very beginning. By the end of the game I’d try to complete 2 sets.
4th space, green Panorama | 5th space, Hot Springs – these are two valid options to earn some free points. Taking the green panorama will also advantage you over the opponents towards the Panorama achievement since there’s only 1 space available.
7th space, Farm – I think this Farm is a good space to stop to not skip activities. You can refill your pockets in preparation for the next expenses.
8th space, Village | 9th space, Temple – this is your call, also depending on the opponents. Go for souvenirs to block characters like Sasayakko or Zen-emon, or go for the Temple to make a 3 coins donation and potentially block characters that synergise well with this activity, like Hirotada.
So this is the gist, souvenirs and temple as your main source of points and a couple of free points activities to round up the total and collect a few achievements.
Since Kinko allows you to go wild with the activities, it’s important that you don’t go too broad otherwise you might not be able to complete souvenir sets nor collect other achievements.
Achievements within reach: Collector, Bather (maybe), Chatterbox (maybe).